Appendix A — About MCTest
MCTest is an open-source system for creating and automatically grading parameterized exams (Zampirolli, 2023). It supports multiple-choice, essay, and programming questions, the latter integrated with Moodle’s VPL, described in Appendix B.
The version of MCTest used in this book is 5.4, available at https://github.com/fzampirolli/mctest. The repository’s book subfolder contains versions 5.3, described in (Zampirolli, 2023), and 5.4, used to generate the exams presented in this book and currently in production at UFABC (https://mctest.ufabc.edu.br).
A.1 Installing MCTest
The recommended installation uses VirtualBox with Ubuntu 22.04. In the Ubuntu terminal, as root, run:
wget https://raw.githubusercontent.com/fzampirolli/mctest/master/_setup-all.shThen replace yourLogin with the local username and run:
sed -i 's/\/home\/fz\//\/home\/yourLogin\//g' _setup-all.sh
source _setup-all.sh
pip install mysqlclient
After a few minutes, MCTest will be configured. To run it:
source /home/yourLogin/PycharmProjects/runDjango.shThe system is then accessible at http://127.0.0.1:8000.
A.2 Creating an exam in MCTest
In MCTest, every exam is configured on an Exam screen, which brings together Classes, Topics (associated with a subject, such as PDI-VC), and Questions — each question belongs to a single topic. Besides the usual database attributes, the exam has its own parameters, such as the number of questions drawn and the number of variations generated.
For the two exams described in this appendix, a set of parameterized questions was defined per exam, from which a subset is randomly drawn for each variation, totaling 110 distinct variations — one per student enrolled in the classes.
The Create-Variations button generates a new set of variations each time it is triggered. When questions are linked to VPL activities, the instructor receives by e-mail a *linker.json file containing all the test cases for the generated variations. The Create-PDF button generates, for each class, a PDF with the exams drawn per student, plus a *students_variations.csv file with each student’s name, e-mail, and drawn variation.
Each click of the Create-Variations button generates a new set of exam variations. After printing the PDF, it is essential not to change the exam’s attributes, at the risk of invalidating the automatic grading of exams already printed or applied.
A.3 Creating a parametric question
A parametric question in MCTest combines three elements:
- Description — the question statement, written in LaTeX, containing variables between
[[code:variable]], which are replaced by the value drawn for each student; - Definition block (
[[def: ... ]]) — a Python code snippet, embedded in the question itself, responsible for drawing the parameters, computing the reference solution, and building the test cases; - Test cases for Moodle (
moodle_casesblock) — a JSON-serialized dictionary containing the expected inputs and outputs, consumed by the VPL activity.
A simplified example of a question definition (adapted from generating an h × w chessboard) is:
[[code:texto]]

\vspace{2mm}\noindent\textbf{Input Example:}\vspace{-2mm}\
\begin{verbatim}
[[code:caso0_inp]]
\end{verbatim}
\vspace{-2mm}\noindent\textbf{Output Example:}\vspace{-2mm}\
\begin{verbatim}
[[code:caso0_out]]
\end{verbatim}

\begin{comment}
[[code:moodle_cases]]
\end{comment}

[[def:
import json
import numpy as np
from topic.morph import mm # MUST include "topic." in MCTest

def chess(h, w):
    m = np.zeros((h, w), dtype='int')
    for i in range(h):
        for j in range(w):
            if (i + j) % 2:
                m[i][j] = 1
    return m

# PARAMETERS USED IN THE QUESTION DESCRIPTION
height = int(np.random.randint(5, 15))

# FULL STATEMENT, WITH THE height VALUE ALREADY INTERPOLATED
texto = (
    r"\vspace{2mm}\noindent\textbf{Description:}\vspace{-2mm} "
    r"Write a program that reads an integer \texttt{W}, representing the "
    r"width (number of columns) of a board, and prints that board in "
    r"the form of a chessboard, using the digits \texttt{0} and \texttt{1}. "
    r"The printed board will always have a height (number of rows) equal to "
    f"\\textbf{{{height}}} "
    r"and a width equal to the value \texttt{W} read from the input. "
    r"Considering position $(i, j)$ of the board (indexed from 0, with "
    r"$i$ representing the row and $j$ the column), the value printed at "
    r"that position must be \texttt{1} if $i + j$ is odd, and \texttt{0} otherwise. "
    r"Each row of the board must be printed on a separate line, with the "
    r"values of each column separated by a space."
)

inp_list, out_list, test_cases = [], [], 4
for i in range(test_cases):
    width = int(np.random.randint(500, 1500) / 100)
    inp = str(width) + '\n'
    out = mm.drawImg(chess(height, width)) + '\n'
    inp_list.append(inp)
    out_list.append(out)

cases = {}
cases['skills']      = ["matrices", "loops", "output formatting"]
cases['description'] = [{"text": latex_to_text(texto)}]
cases['input']       = inp_list
cases['output']      = out_list

moodle_cases = json.dumps(cases)

caso0_inp = cases['input'][0]
caso0_out = cases['output'][0]
]]
The height value is drawn once per variation (to appear in the statement), while width is drawn for each test case, increasing the robustness of automatic grading.
It is worth highlighting the dual role of the texto variable in this mechanism. It is at the same time:
- the content of the printed statement, inserted into the question’s LaTeX description through the
[[code:texto]]tag, appearing in the PDF generated by the Create-PDF button; and - an entry in the dictionary exported to Moodle, through the
cases['description']key, which becomes part of themoodle_casesJSON. It is precisely this field that the VPL activity shows the student when they open the question in Moodle to review it or submit a solution.
There is, however, an important difference between these two uses: the PDF is composed in LaTeX and therefore normally interprets commands such as \textbf{}, \texttt{}, or $...$. Moodle’s VPL, on the other hand, does not process LaTeX — it expects plain text. That is why, when building cases['description'], texto is not inserted directly, but passed through MCTest’s own utility function latex_to_text(), which removes (or converts) the LaTeX commands and symbols from the statement, producing an equivalent plain-text version. Thus, [[code:texto]] in the PDF still receives the original texto, with all its LaTeX formatting, while cases['description'] receives latex_to_text(texto), ensuring that the statement shown in Moodle is readable even without LaTeX support.
Since texto is built inside the [[def: ...]] block itself — in the same scope where height, width, and the other parameters are drawn —, it is recalculated for every variation. This guarantees that the statement seen by the student in Moodle is always identical to the one printed on the paper exam, even when the text changes from student to student along with the drawn values. Section A.4 revisits this point with a real case, in which the statement is significantly longer and describes, besides the numeric parameters, the visual scenario itself generated for each variation.
Figure A.1 shows the chessboard question actually generated by MCTest for one of the variations, with the statement already containing the drawn value of height and the input/output example corresponding to the first test case:
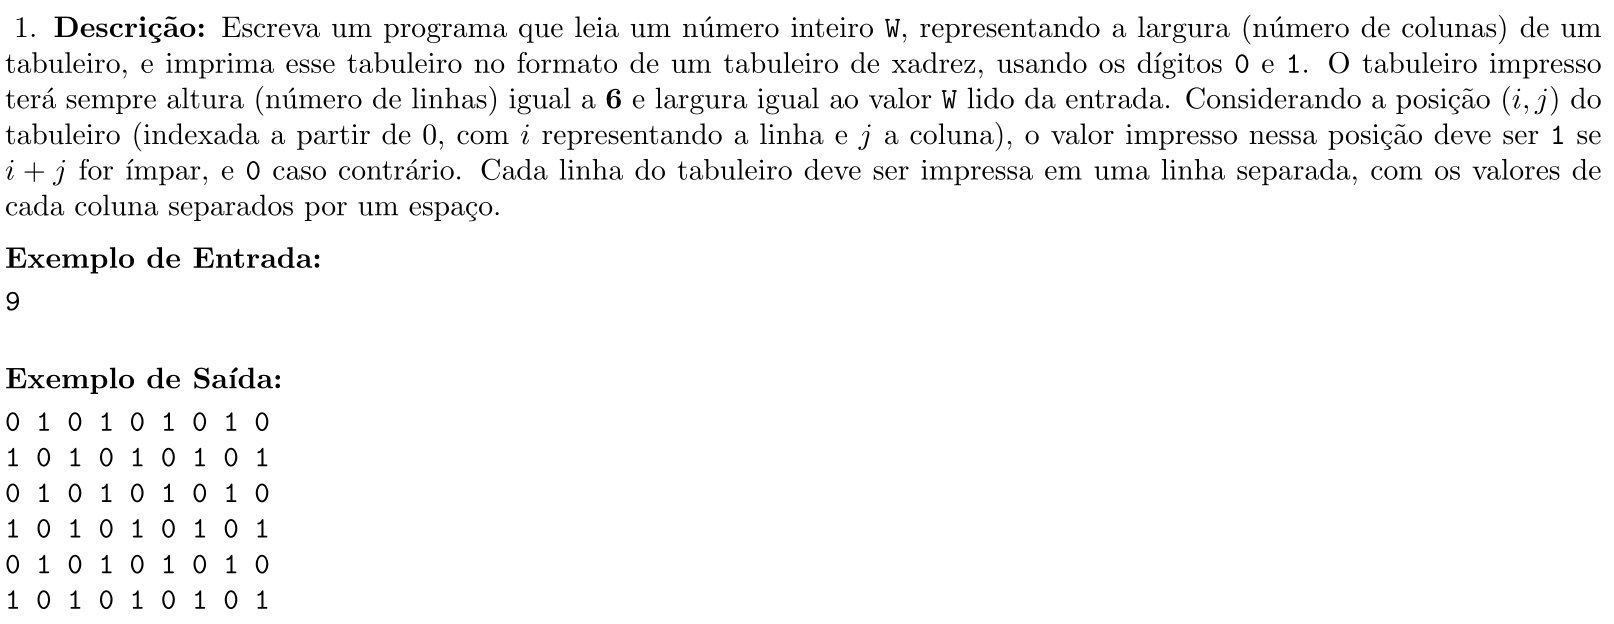
height value drawn for the variation and the input/output example of the first test case.
Clicking Create-PDF on the question screen generates a new variation with each click, allowing the statement to be checked before publishing.
For the two exams of the course, this mechanism was used more broadly: each parametric question defines not only numeric values but also, in some cases, small structural variations in the statement (for example, which cardinal direction — North, South, East, West — should be evaluated), making it harder to find ready-made solutions online or via generative AI tools.
A.4 Real example: a question from Mock Exam 4
To illustrate the mechanism described in the previous section with a concrete case, the following is a question actually applied in Mock Exam 4 (topic im4-Morphological Operators, difficulty 1, Bloom’s taxonomy “remember”), a parameterized programming question with Moodle+VPL integration.
The question asks the student to write a program capable of:
- reading a binary image, corrupted by salt-and-pepper noise, containing at least two isolated geometric objects;
- applying morphological filtering (opening followed by closing) to remove the noise;
- extracting, from the filtered image, the geometric measurements of each object (area, perimeter, center, bounding box, circularity, solidity, and number of vertices), using the helper function
mm.measure; - sorting the objects by position (bounding-box X coordinate, with Y as tiebreaker) and reassigning the identifiers sequentially;
- printing the cleaned matrix and the measurement table in the format expected by the automatic grader.
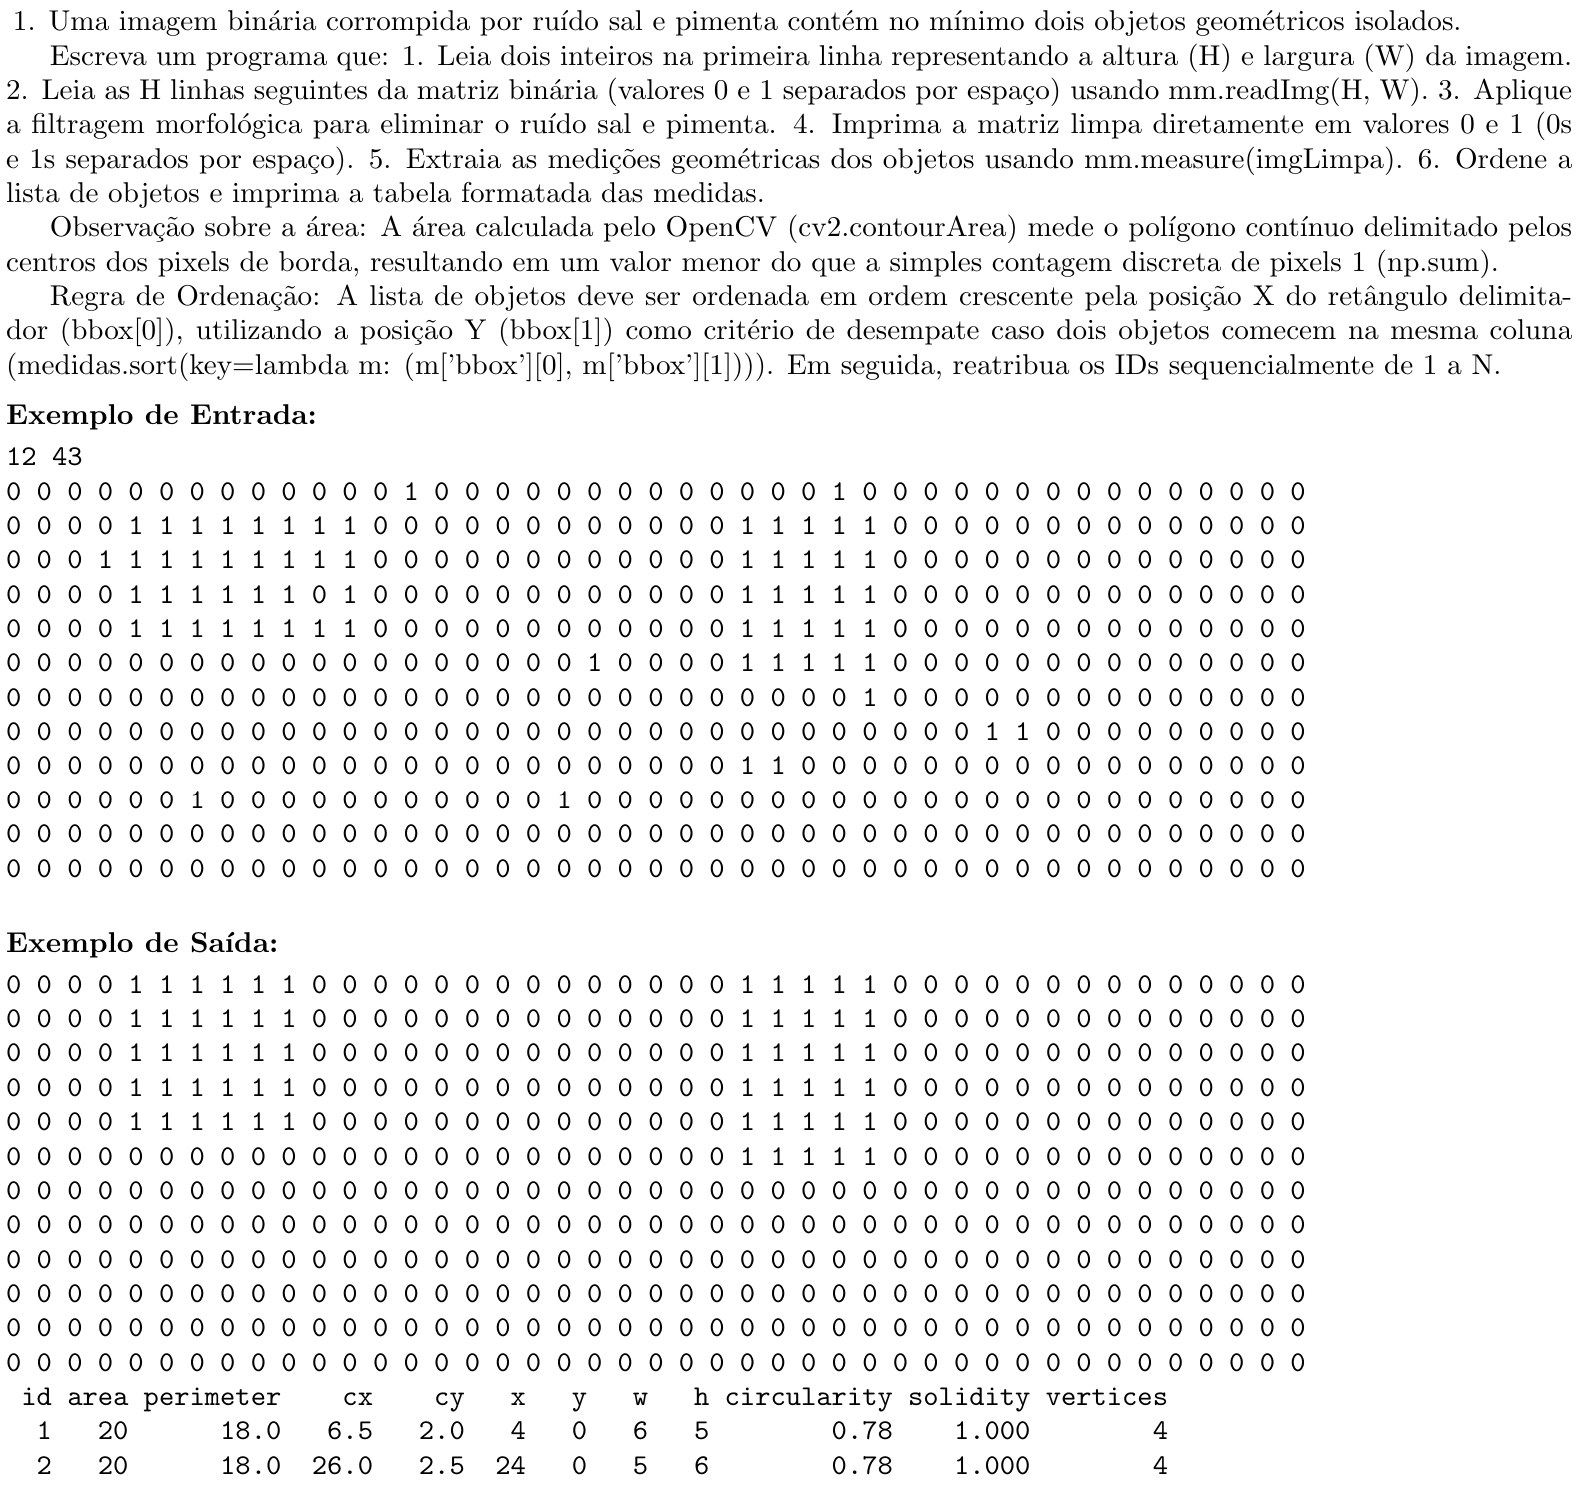
In the corresponding [[def: ... ]] block, a scene generator (gerarCena) randomly draws the height and width of the image, the type, size, and position of each object (square, rectangle, triangle, or block), ensuring they do not overlap, and then adds salt-and-pepper noise with a 3% probability per pixel. Ten distinct test cases are generated this way for each exam variation, and the input/output pair of the first case is reused in the statement itself as an example for the student. The morphology library (mm) is imported directly from morph.py, also available as MCTest’s own utility module.
In summary, the statement asks the student for a program that:
- reads, on the first line, two integers H and W (image height and width);
- reads the following H lines of the binary matrix (0s and 1s separated by spaces), using
mm.readImg(H, W); - applies morphological filtering to remove the salt-and-pepper noise;
- prints the already filtered matrix, as 0s and 1s separated by spaces;
- extracts the geometric measurements of the objects with
mm.measure(imgLimpa); - sorts the objects and prints the measurement table in the expected format.
The statement also brings two important observations for automatic grading: (i) the area computed by OpenCV (cv2.contourArea) corresponds to the continuous polygon delimited by the centers of the border pixels, and is therefore smaller than the simple count of pixels equal to 1 (np.sum); and (ii) the list of objects must be sorted in ascending order by the bounding-box X coordinate (bbox[0]), using the Y coordinate (bbox[1]) as tiebreaker, with the IDs reassigned sequentially from 1 to N after sorting.
As in the example in Section A.3, the statement text here is also not fixed: it is built inside the [[def: ... ]] block itself, in the Python variable texto, and plays the same dual role already described — it feeds the PDF via [[code:texto]] and is exported, already converted by latex_to_text(), into cases['description'] inside moodle_cases, which is the version shown to the student in Moodle’s VPL. The difference is that, in this real case, it is the visual scenario (noisy image, number and position of objects) that changes from student to student with each variation, while the wording of texto stays fixed across variations, since only the numeric data (image and test cases) are drawn. Ideally, the wording would also vary with each generation, as in the previous example, where the height value was interpolated directly into the description text. The actual structure used (with scenario-drawing snippets omitted for brevity) is:
[[code:texto]]

\vspace{2mm}\noindent\textbf{Input Example:}\vspace{-2mm}\
\begin{verbatim}
[[code:caso0_inp]]
\end{verbatim}
\vspace{-2mm}\noindent\textbf{Output Example:}\vspace{-2mm}\
\begin{verbatim}
[[code:caso0_out]]
\end{verbatim}

\begin{comment}
[[code:moodle_cases]]
\end{comment}

[[def:
import json
import numpy as n
import cv2
from topic.morph import mm # MUST include "topic." in MCTest

# ... scene, noise, and 10 test-case generation (inplist/outlist) ...

# FULL STATEMENT, WITH EXPLANATION OF AREA AND SORTING
texto = (
    "A binary image corrupted by salt-and-pepper noise contains at least two isolated geometric objects.\n\n"
    "Write a program that:\n"
    "1. Reads two integers ..."
)

cases = {}
cases['skills']      = ["mathematical morphology", "noise removal", "mm.measure", "tabulation"]
cases['description'] = [{"text": latex_to_text(texto)}]
cases['input']       = np.array(inplist).tolist()
cases['output']      = np.array(outlist).tolist()

moodle_cases = json.dumps(cases)
caso0_inp = cases['input'][0]
caso0_out = cases['output'][0]
]]
Below is the photograph of the question actually generated and printed for one of the 110 variations of Mock Exam 4, showing the statement, the noisy input image, and the expected output example (filtered image and measurement table):
A.5 Final remarks
This appendix summarized the steps to install MCTest, create exams, and build parametric questions with Moodle VPL integration. The combined use of variables drawn in the description ([[code:...]]) and Python code embedded in the question itself ([[def: ... ]]) makes it possible to generate hundreds of exam variations from a single template, each graded automatically and consistently — with the texto variable, in particular, guaranteeing that the same statement is shown both in the printed PDF and when the question is reviewed by the student in Moodle. The real example of Mock Exam 4 (Section A.4) illustrates how this mechanism is used in practice to generate programming questions with visual scenarios that differ per student. Appendix B details how these variations are published and graded in Moodle, and Appendix C describes how to restrict access to exams using SEB.